Introducing a New Series: Our States, Our People, Our Food

Image borrowed from this Clickhole article.

Lately, I’ve been finding myself feeling great despair about the state of affairs in this country. With so much violence against our black and brown brothers and sisters and transwomen and men, ridiculous anti-immigrant and anti-woman presidential candidates, and the complacency around rape culture, to name only a few things, I have been actively trying to remember what I love about this place. Since this blog has been really helpful in guiding me through some of my issues around anxiety and insecurity (public vulnerability is pretty rad), I thought I could do something similarly transformative (for me). Therefore, I’m starting a new and long-term series that will highlight a community in each state, and focus on the resilient and diverse people who make up this nation great. Each entry will go through a select community living in a state, provide a brief and interesting history of that group in that locale, and highlight a dish related to them, which I will have cooked and eaten. Per example, for the state of Alabama I’d like to delve into the history of Africatown’s people (a community formed after a wealthy businessman brought the last known ship filled with captured Africans to the United States on a $100,000 even though the trans-Atlantic slave trade had been outlawed for more than fifty years), and cook something with Ghanian influence.

As somewhat of a nerd(!), I am very much looking forward to the process of researching each state’s communities and its histories of migrants and indigenous people. While some may view this series as somewhat tedious and didactic, I very much believe it will reinvigorate my sense of joy when thinking about this nation. Learning a little about how people have come to be part of strong communities will be a small act of love.

Though I’m trying to be more flexible with my own goals, I’m hoping to publish two of these entries per month. I will continue to post my “regular” stuff, but thought it would be fun to intersperse this series throughout the blog. I probably won’t start this until mid-September, since my husband’s amazing parents will be visiting from Italy. But,  be prepared for some geeky fun, exploration of foods, and a whole lot of love for this country’s diversity!

Meal Planning 101: On Creating a Menu for Dinner Guests, Plus Recipes Abound!

Disclaimer: I am back to my verbose ways, and this entry is long. My promises mean nothing, but I’m pretty sure the next post will be short. Bear with me!

Psst. Want to know a secret? I’m an effusive person.

Gasp! It’s probably painfully obvious that I lack restraint when demonstrating and articulating my love for people (and food and TV). Why? Enter the Myers-Briggs Personality Test. Though I don’t fully buy into it, I’ve found the test and its analysis helpful in understanding what motivates me. And, true to obsessive form, I’ve taken the Myers –Briggs Personality Test at least 10 times in my life, all with the same result. I am solidly an ENFJ. According to 16personalities.com:

ENFJs are natural-born leaders, full of passion and charisma. Forming around two percent of the population, they are oftentimes our politicians, our coaches and our teachers, reaching out and inspiring others to achieve and to do good in the world. With a natural confidence that begets influence, ENFJs take a great deal of pride and joy in guiding others to work together to improve themselves and their community.”

There’s the good. Here’s the rub:

“While ENFJs enjoy lending this helping hand, other personality types may simply not have the energy or drive to keep up with it – creating further strain, people with the ENFJ personality type can become offended if their efforts aren’t reciprocated when the opportunity arises. Ultimately, ENFJs’ give and take can become stifling to types who are more interested in the moment than the future, or who simply have Identities that rest firmly on the Assertive side, making them content with who they are and uninterested in the sort of self-improvement and goal-setting that ENFJs hold so dear.”

Stifling. I’m stifling! Oh god. Oh yikes.

So, in the last year I’ve been trying to redirect my somewhat manic desire to demonstrate (and receive) love in my ideal form* towards something more palatable and enjoyable for all parties. I do this by cooking for people.

*ideal form: I hold your face in my hands, you hold my face in your hands, we look deep into each other’s eyes and talk about the ins and outs of everything we hold dear until our souls are exhausted by satiation.

310775_934080433177_54748829_n

This is generally what it looks like when I love someone.

Though I’m still a bit intense whilst coming up with a menu for dinner guests, at least my friends won’t feel suffocated from my effort – they’ll just eat something that is hopefully tasty and comforting. For some reason, I kind of liken this situation to the phrase, “A tired dog is a happy dog.” You know, take your dog on a goddamn run so s/he won’t eat your couch. It’s as if I need to use up all my energy preparing something in order to be a less hyperactive and demanding person.

Before I expose too much of my nuttiness, here are the things I consider when coming up with a dinner menu for guests:

  1. How many people am I serving?
    This matters. While I may do something more complex and intricate for one guest, it may not be feasible or practical to do that on a larger scale for 5+ friends. When serving more than four total people, I will likely do something that involves fewer steps or one pot, like seared skirt steak, bibim guksu, braised pork ribs and cabbage, crab fried rice, or a risotto. On the other side of this, sometimes a bigger audience provides the best opportunity to try something more labor intensive that would be “wasted” on just me and my husband. For instance, we might want to one day host a Homemade Porchetta + Ciabatta + Beer party, and that would definitely work better for a larger group of guests.
  2. Do any of my guests have dietary restrictions?
    I always ask my dinner guests if they have any dietary restrictions or major dislikes. There is nothing more disappointing than watching loved ones try to eat something they hate, especially if it’s something I’ve made. If I have several guests, and only one of them is vegetarian or vegan, I will usually make a “family style” meal so that everyone has something to eat, and the vegetarian/vegan doesn’t have to be singled out. This serves as a nice parameter, because some dishes are better than others served in this fashion.
  3. What is my budget?
    For me, it’s important to determine the budget for dinner with guests so that I’m keeping track of all expenses. I never want to tip way over my usual spending, so this will often help me to figure out items for a delicious meal that won’t rob my wallet. For more on organizing around a budget, click here.
  4. What is the weather/temperature like?
    I think about this not because I don’t think one should eat stews in summer or salads in winter, but because I don’t want my guests to be uncomfortably hot or cold while they’re eating. If it’s hot in the apartment (either beacuse it’s a balmy 98 degrees outside, or it’s cold, but the heater is on a rampage), I’ll likely do something that doesn’t require much oven/stove use. Or, I’ll make something that can be roasted/cooked in advance, so the apartment doesn’t feel like an aroma sauna. If it’s cold in the apartment, I’ll make the warmest darn stew of all time. In mild and dry weather, anything is game.
  5. How much time do I have to prepare the meal?
    If given the choice, I would want to spend loads and loads of time preparing a meal for friends. But, people often come over on weekdays, which means that I have a short window between getting home from work and dinnertime to get shit ready. Of course, if I’m being particularly clever, I can prep some elements the night before, but I’m often not very smart. Even though this can seem like a bummer, time serves as helpful constraint. What dishes can I make in 1-2 hours that won’t exhaust me (who wants to dine with a grumpy and tired Yejin? NO ONE) but will still be tasty and well rounded? For last night’s guest, I made an appetizer, entree, side dish, and dessert in the span of 2 hours.
  6. Is there one thing in particular I want my guests to try?
    Based on all these other questions, which generally gives me a sense of what NOT to prepare, I will start planning my meal by selecting one element/dish I know I want to feed my guest. This is extremely helpful, and makes the process less stressful or overwhelming. Based on that one thing, you can then form the rest of your menu with complementary (or contradictory) items. Recently, I made Hainanese Chicken and Rice, and it was the best thing I had made all month. So, I wanted to share the joy with a friend who came over for dinner on Tuesday. Since the poulet served as an entrée, I started to think of other elements that would complement the light but earthy flavor of the dish. I thought it would be nice to start the meal with a simple and delicious kimchi pancake appetizer, since there is very little tang in the chicken. To accompany the entrée, I wanted a flavorful vegetable, but one that wouldn’t drown out the subtle taste and aromas of the entree. So I chose roasted brussel sprouts and shallots topped with a touch of fish sauce vinaigrette. Since the appetizer and main dish are both quite light, I wanted to end the evening with a deeply flavored and rich dessert. Enter Nigella Lawson’s dense chocolate loaf cake with bourbon and coffee, topped with homemade whipped cream and raspberries.

And, because I thought it’d be nice (and maybe a bit stifling and overwhelming), here are recipes for Tuesday’s meal:

  • Kimchi pancake
  • Hainanese Chicken and Rice
  • Roasted Brussel Sprouts and Shallots with Fish Sauce Vinaigrette
  • Nigella Lawson’s Chocolate Loaf Cake with Bourbon and Coffee

Processed with VSCOcam with hb1 preset

Kimchi Pancake Recipe
Recipe modified from Maangchi.com
Servings: 2-3
Prep Time: 10 minutes
Cooking Time: 10 minutes

Ingredients

1 cup of chopped kimchi
2 tablespoons of kimchi juice
3 chopped scallions
½ teaspoon of salt
½ teaspoon of sugar
½ cup of flour
¼ cup of water

Instructions

  1. Place kimchi, kimchi juice, scallions, salt, sugar, flour, and water into a medium sized bowl. Mix well with a spoon.
  2. Heat up a 12 inch non-stick pan over medium high heat and drizzle about two tablespoons of oil (canola or grapeseed is fine).
  3. Place the mixture of kimchi pancake batter on the pan and spread it thinly and evenly with a spoon.
  4. Cook it for 1 ½ minutes until the bottom becomes golden brown and crispy
  5. Turn it over with a spatula or flip it. Lower the heat to medium and cook for another 1 ½ minutes.
  6. Turn it over one more time and cook for 30 seconds before transferring it to a serving plate.

Processed with VSCOcam with a4 preset

Hainanese Chicken and Rice
Recipe taken from The Woks of Life
Servings: 4-5
Prep Time: 15 minutes
Cooking Time: 1 hour

Chicken Ingredients

1 whole fresh chicken, about 3-3 ½ pounds
1 tablespoon of salt
12-14 cups of water
4-5 slices of ginger
2 whole scallions
Ice 

Chicken Instructions

  1. Wash the chicken clean and remember to set aside the piece of chicken fat at the back cavity for the rice. Transfer the chicken to a plate and pat dry with a paper towel. Lightly rub the chicken with the salt. This will give the chicken skin a nice sheen. Set it aside.
  2. Bring the water, along with the ginger and scallions, to a boil in a large stockpot. Before adding the chicken to the pot, rinse the chicken under running water to wash away the salt. Carefully lower the chicken into the boiling water, positioning the chicken breast-side up. Now is a good time to adjust the water level so the chicken breast just pokes above the water (so you aren’t left with dry white meat).
  3. Once the water boils, carefully lift the chicken out of the water to pour out the colder water that is trapped in the cavity. Carefully lower the chicken back into the pot. Bring the water to boil again, and cover the lid. Turn off the heat, and leave the pot, covered, on the stove for 45-50 minutes (set a timer). To check if the chicken is done, stick a toothpick into the thickest part of the drumstick; if the juices run clear, it’s cooked through.
  4. When the 45-minute timer (for the chicken) is almost up, prepare a large ice bath. Once the chicken is cooked, carefully lift the chicken out of the pot, drain the water from the cavity and lower it into the ice bath. Take care not to break the skin. After 15 minutes in the ice bath, the chicken should be cooled, drain completely and cover with clear plastic until ready to cut and serve. The ice bath stops the cooking process, locks in the juices, and gives the chicken skin better texture.

Rice Ingredients

Chicken fat, taken from the back cavity of the chicken
4 cloves of garlic, minced
3 cups of white rice, preferably jasmine, washed and drained
Chicken stock, from cooking the chicken
2 teaspoons of salt

Rice Instructions

  1. While the chicken is cooling, make the rice. Heat a wok over medium heat. Add the chicken fat and render for about a minute. Stir in the minced garlic and fry briefly, making sure it doesn’t burn.
  2. Add the uncooked rice. Stir continuously for about two minutes.
  3. Turn off the heat. Scoop the rice into your rice cooker and add the appropriate amount of chicken stock (instead of the usual water. This amount may vary depending on your rice cooker) and salt. Close the lid and press START.
  4. If you don’t have a rice cooker, you can follow these steps. When you wash your rice, let it soak for an additional 20 minutes. Then drain the rice and follow the same steps above, but instead of transferring the rice mixture to your rice cooker, transfer it to a medium/large pot. Add 3 cups of chicken stock and the salt, giving it a quick stir. Cover the pot and bring to a boil. Once it boils,immediately turn down the heat to the lowest setting. Let the rice simmer and cook (covered) for 10-15 minutes until the rice is done. It’s not quite as foolproof as the rice cooker, but you should get a very similar result. Just be sure to keep an eye on it; burnt rice is no fun.

Sweet Dark Soy Sauce Ingredients

1/3 cup of water
3 tablespoons of rock sugar
1/3 cup of dark soy sauce

Sweet Dark Soy Sauce Instructions

Heat the water and sugar in a small saucepan over medium heat. Stir constantly until the sugar dissolves and the liquid thickens into a simple syrup. Add the dark soy sauce, stirring to combine. Transfer to a sauce dish.


Processed with VSCOcam with hb1 preset

Brussel Sprouts Oven Roasted And Fish Sauced
Recipe taken from iamafoodblog.com
Servings: 2-4 as a side
Prep Time: 15 minutes
Cooking Time: 45 minutes

Ingredients

1 clove of garlic, minced|
1 bird’s eye chili
1 tablespoon of sugar
Juice of ¼ a lime
½ cup of water
1 tablespoon of fish sauce
1 pound of Brussel sprouts
2 shallots, peeled and quartered
2 tablespoons of oil
Salt and pepper

Instructions

  1. Preheat the oven to 400°F.
  2. Crush the garlic, chili and sugar together in a mortar. Transfer to liquid measuring cup and dissolve the sugar, garlic and chili mixture with the water. Add the lime juice then fish sauce. Set aside.
  3. Trim the ends of the sprouts and remove any outer leaves that are loose or discoloured. Cut sprouts in half. Toss the cut sprouts and quartered shallots with oil and salt and pepper. Place in an oven-proof dish and roast, stirring every so often, until deeply browned, 35-40 minutes.
  4. Remove from the oven, toss with the fish sauce vinaigrette and enjoy immediately.

Processed with VSCOcam with hb1 preset

Nigella Lawson’s Dense Chocolate Loaf Cake

Recipe taken from Alexandra’s Kitchen
Source: Nigella Lawson’s 
How to Be a Domestic Goddess
Servings: 2 loaves
Prep Time: 20 minutes
Cooking Time: 45 minutes

Ingredients

1 cup soft unsalted butter
1 2/3 cup (316 g | 11 1/8 oz) dark brown sugar
1 1/3 cup (170 g) all-purpose flour
1 teaspoon baking soda
1 teaspoon sea salt, such as Maldon or Fleur de sel (or use 3/4 teaspoon kosher salt)
2 large eggs
1 tablespoon vanilla extract
4 ounces best bittersweet or semisweet chocolate, melted (I did this in the microwave at 30 second intervals, but don’t walk away — it will burn quickly)
2 tablespoons brandy or bourbon
1 cup freshly brewed coffee

Instructions

  1. Heat the oven to 375°F. Line a 9×5-inch loaf pan with parchment paper — just shove a whole sheet in there (versus cutting to make it fit — this way no batter will seep through the cracks). Also, prepare a smaller loaf pan (or some other vessel such as a muffin tin) in a similar manner — I butter the smaller loaf pan well, and I never have issues getting the cake out.
  2. Cream the butter and sugar, either with a wooden spoon or with an electric hand-held mixer.
  3. Meanwhile, whisk together the flour, baking soda and salt. Set aside.
  4. Add the eggs and vanilla to the butter-sugar mixture and beat until combined.
  5. Next, fold in the melted and now slightly cooled chocolate, taking care to blend well but being careful not to overbeat. You want the ingredients combined: You don’t want a light, airy mass. Add the brandy and mix to combine.
  6. Next, gently add the flour mixture alternately spoon by spoon with the coffee until you have a smooth and fairly liquid batter.
  7. Pour into the lined loaf pan, being sure the batter does not come closer than 1 inch from the rim of the cake pan or it risks overflowing. Pour the excess into the smaller prepared pan. Bake 30 minutes. Turn the oven down to 325 degrees and continue to cook for another 15 minutes. (I remove the smaller pan after the first 30 minutes.) The cake will still be a bit squidgy inside, so an inserted cake tester or skewer won’t come out completely clean. Place the loaf pan on a rack, and leave to get completely cold before turning it out. (Leave it for a whole day if you can resist.) Don’t worry if it sinks in the middle — it will do so because it’s such a dense and damp cake.

Processed with VSCOcam with hb1 preset

Coming Up…Introducing a New Series Honoring the Diverse Communities and Histories of the U.S. 

Pairing TV Shows with Three-Course Meals: Arrested Development

I was recently looking back at old entries and realized that some of my posts are about a bajillion words long. In an effort to be more concise (sometimes), I’m trying to narrow the scope of my entries, a bit. So, in the latest installment of “Pairing TV Shows with Three-Course Meals,” (click here to see the first post) I decided that I would just highlight one excellent comedy series: Arrested Development.

Likely my favorite comedy show of all time, Arrested Development is full of wit, snark, epic storytelling, and distinguishes itself from all other shows because of my love/hate relationship with every single goddamn character. Also, there are few comedies that make both me and my husband laugh aloud. You know the kind where you’re totally not prepared to burst out laughing, so you end up spraying an inappropriate amount of saliva over your furniture/loved ones?

So, as far as the menu goes, I went in a more literal direction, since there are so many food-related gems in the series. Without further ado, I present to you my very heavy three-course meal for Arrested Development.

Course One: A Mayonegg Banger in the Mouth
Scotch Eggs: Hard boiled qual egg wrapped in sausage, coated in breadcrumbs, then fried. Should probably be fried in the very dangerous cornballer.

George Michael: She sometimes takes a little pack of mayonnaise and she’ll squirt it in her mouth all over. And then she’ll take an egg and kind of…mmmm! She calls it a ‘mayon-egg.’ Are you okay?

Mrs. Featherbottom: Who’d like a banger in the mouth? Oh, right, I forgot. Here in the states you call it a sausage in the mouth.
Michael: We just call it a sausage.

Course Two: Annyong’s Improved Hot Ham Water
Budae-Jjigae: Army stew with kimchi, spam, bacon, hot dogs, ramen noodles, baked beans, mushrooms, onions, and cabbage

Course Three: The Banana Stand’s Ten Dollar Cornhole
Deep-Fried Banana Corn Fritters with Honey

Lucille: Everyone’s laughing and riding and cornholing except Buster.

Coming Up…Meal Planning 101: On Creating a Menu for Dinner Guests, Plus Recipes for Hainanese Chicken Rice, Roasted Brussel Sprouts and Shallots in Fish Sauce Vinaigrette, and Nigella Lawson’s Chocolate Loaf Cake with Bourbon and Coffee

Meal Planning 101: Organizing around a Budget, plus a Pickled Egg Salad Recipe

In my first installment of the Meal Planning 101 series, I wrote about reusing versatile ingredients, which helps to tighten parameters, develop one’s palate, and save time and money. Truth be told, in response to my recent week-long “funk,” I went all out and spent way too much money on groceries for last week’s menu. I tend to function like a pendulum –either I’m on one side of an extreme or the other, and if I’m not, I’ve stopped moving and am probably dead. In any case, I thought it would be helpful to talk about budgeting. As you likely know by now, I like to impose limits and parameters on everything that I do, because the burden of choice can be too much for an anxious person like me. A budget is one of the most important frameworks, and can be really annoying to navigate when you’re a cravings-centric person like I am (lobster all the time, dammit!).

So, I’m not going to go through exactly how to budget one’s meal, because I think that the process, amount, and priorities are different for everyone depending on circumstances and preferences. What I’ll do, instead, is walk you through my general approach to choosing ingredients and meals based on a budget. To be clear, this post is not primarily about creating a menu based on a small/tight budget. I’ll do that another time.

Typically, I’m okay with spending an average of $14/day per person on groceries, and maybe a tad more when we host dinners with friends. Keep in mind that my husband and I rarely eat out or get delivery, even for lunch. This will cover breakfast, lunch, dinner, and when I’m feeling especially naughty, desserts and snacks. And, for the most part, my husband and I eat really, really well. There are definitely occasions when I need to spend less on groceries, whether it’s because I’ve just made a big purchase, and really need to replenish my piggy bank, or, those fleeting moments when I realize that I should have a LOT more dough stashed in a retirement fund, or when things are just generally tight. When that happens, here’s what I consider:

What can I spend?

The easiest and most important parameter is the actual budget. What can you/are you willing to spend on groceries, this week? This week, I gave myself a $120 budget.

What essential ingredients should I have in stock?

You may want to consider joining a place like Costco or Sam’s Club to stock up on essentials. Canned tomatoes and beans are always good to have on hand and are probably cheaper when buying in bulk. You can also grab important items like olive oil, vinegar, soy sauce, and other condiments when they’re on mega-sale somewhere, so you don’t have to constantly add these things to your grocery list.

What are some cheap go-to meals?

It’s always good to have some inexpensive meals in your pocket. I always make sure to have a pile of canned goods (tomatoes, beans), a variety of pastas, and rice. Also, I always have in stock essential items like onions, garlic, crushed red peppers, and anchovies. With these in place, I’m poised to make a cheap (and usually, quick) meal. Some of my go-to meals are: spaghetti aglio e olio (garlic and oil), pasta all’amatriciana, rice and beans, and pasta al pomodoro. This week, these dishes include a pasta al pomodoro, and a pickled egg salad.

What are cheaper ingredients?

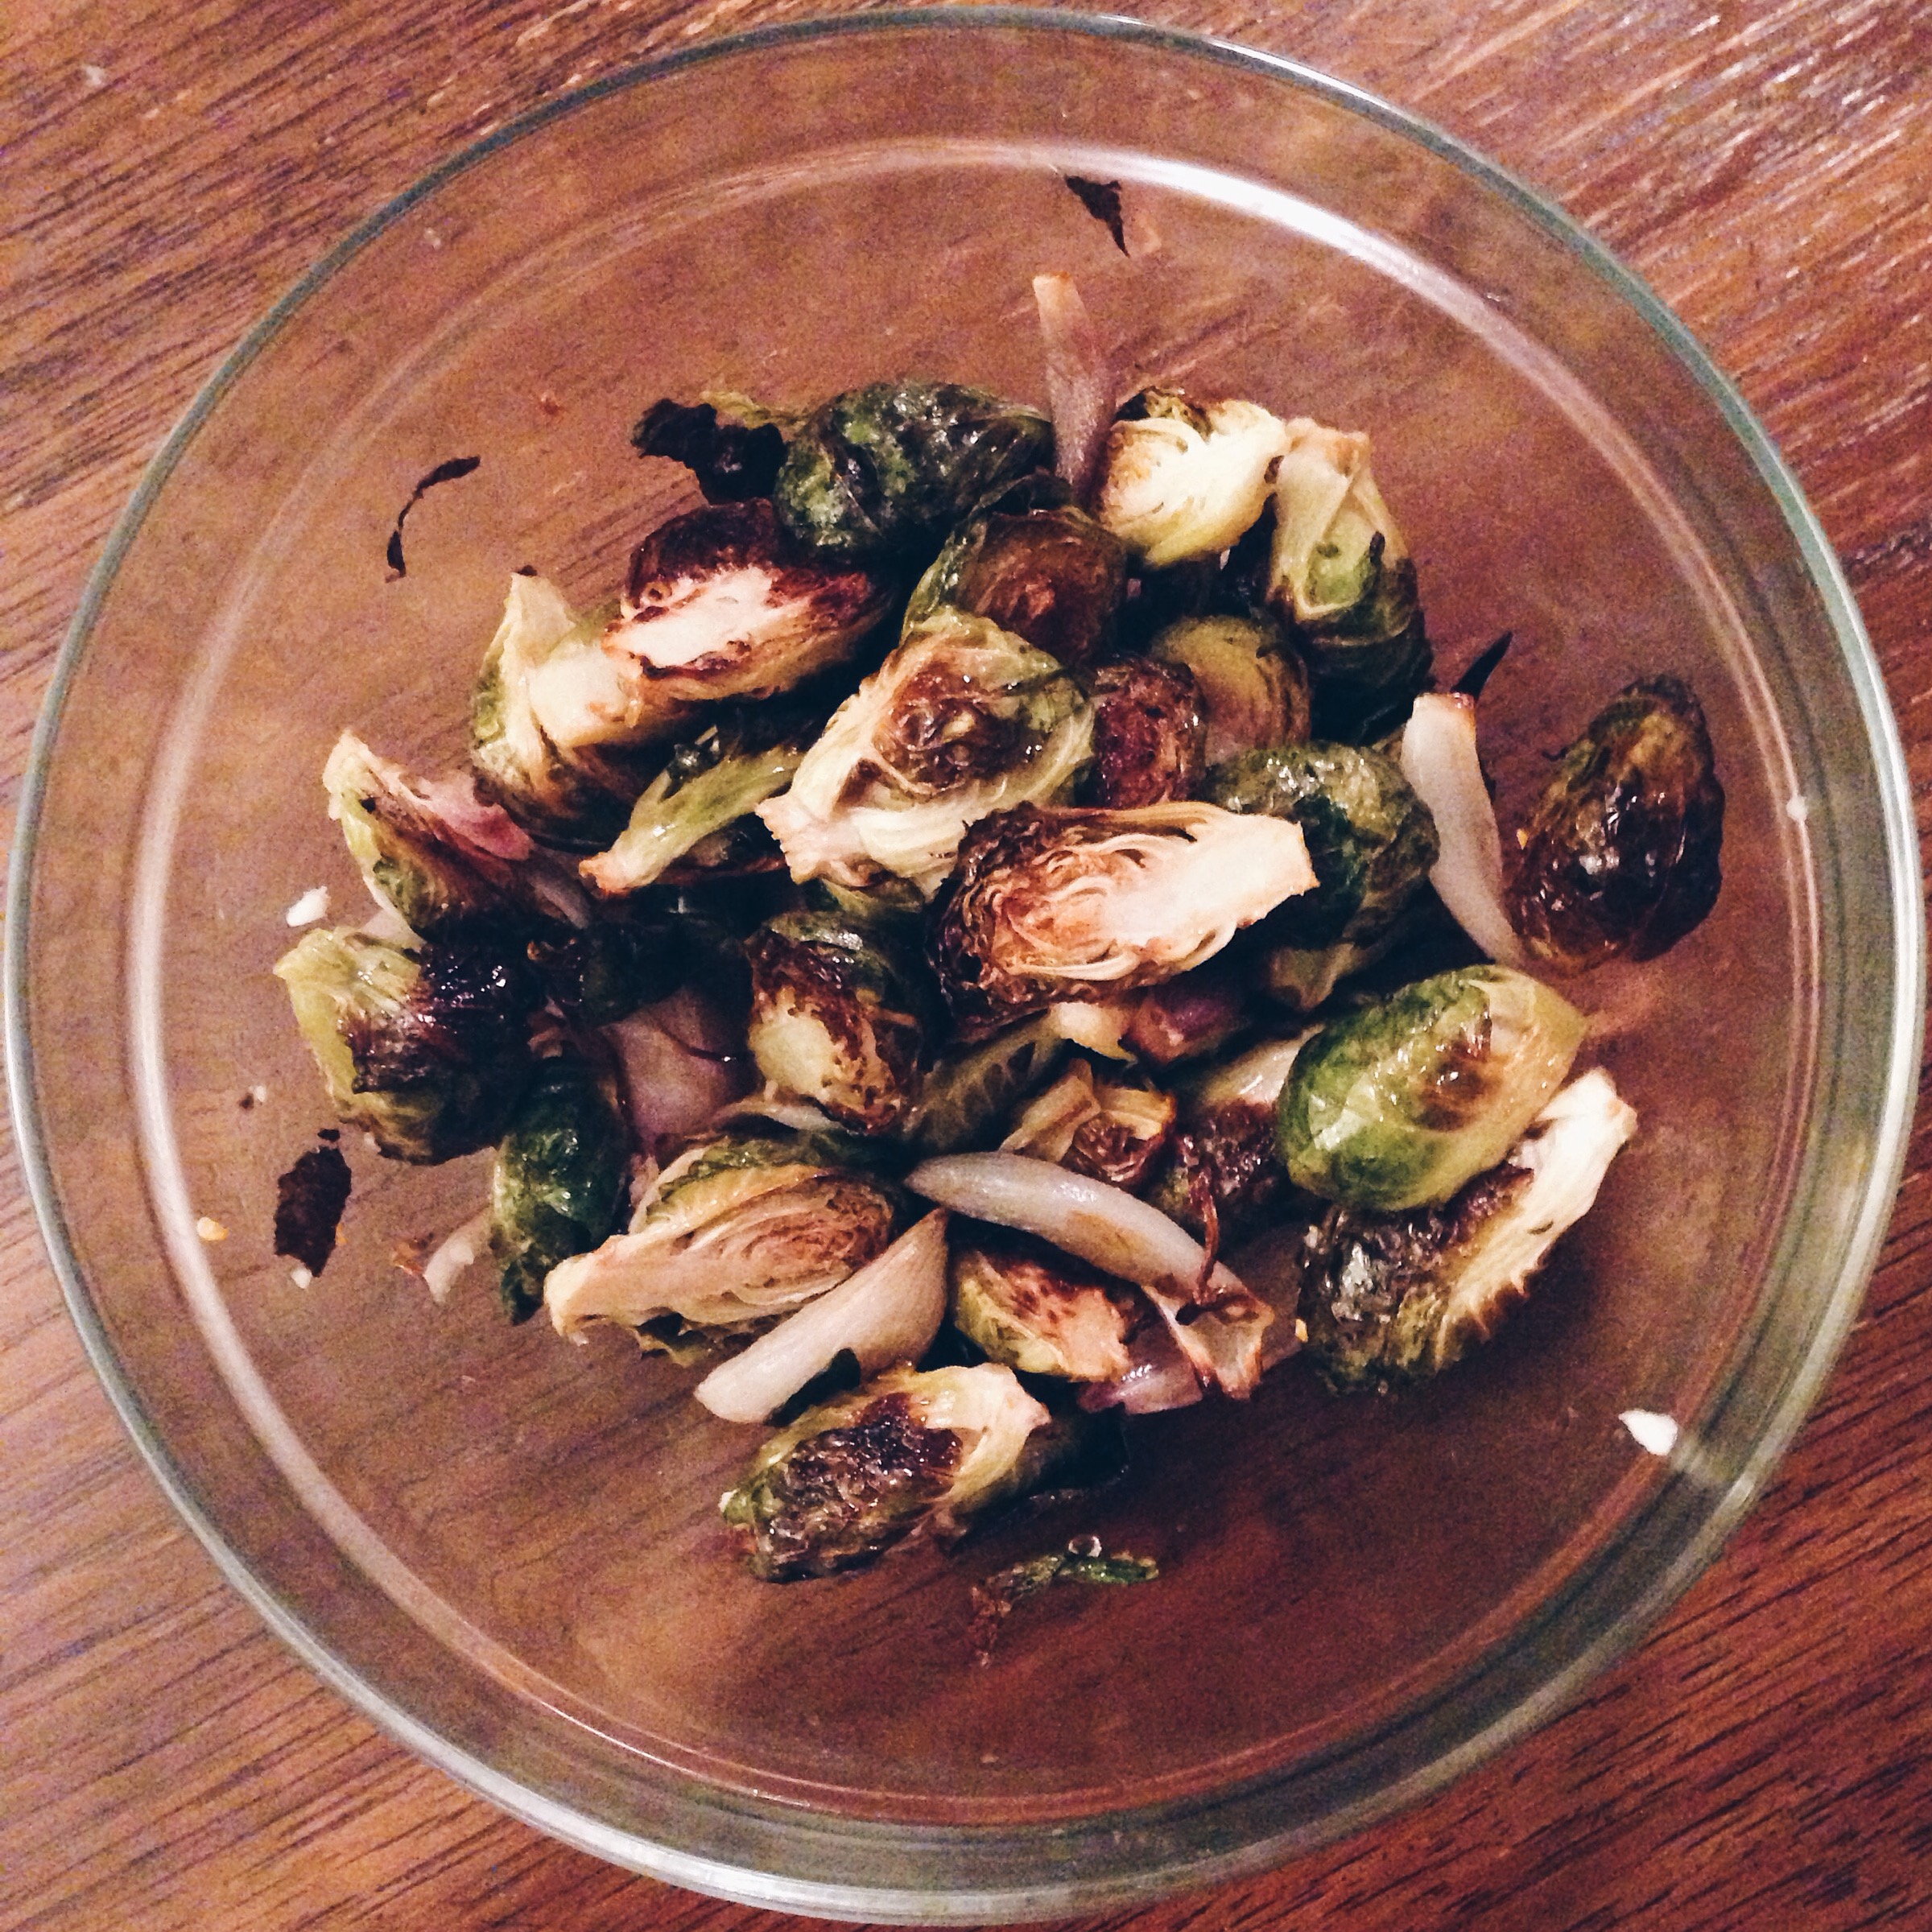
When thinking about your meal for the week, it’s good to already have a sense of what foods are generally less expensive. For example, if you’re a meat-eater, chicken and pork are usually the cheaper options. Within the poultry category, dark meat is usually more affordable (and delicious), and bone-in cuts are generally even more forgiving on your wallet. I bought boneless/skinless chicken thighs for a katsu, and didn’t have to spend much dough for what will be a super filling and hearty meal. Consider the same thing with vegetables/produce, which are sadly often even more expensive than meat (thank the government’s insane subsidization of the meat industry) – generally, potatoes, cabbages, onions, carrots, and cauliflower are on the cheaper side of town. This may seem like a bummer, but there are so many wonderful things you can do with each of these ingredients. Cabbage was a good bet, and I’ve been enjoying a simple summer salad with raw red cabbage, carrots, and edamame.

What’s on sale?

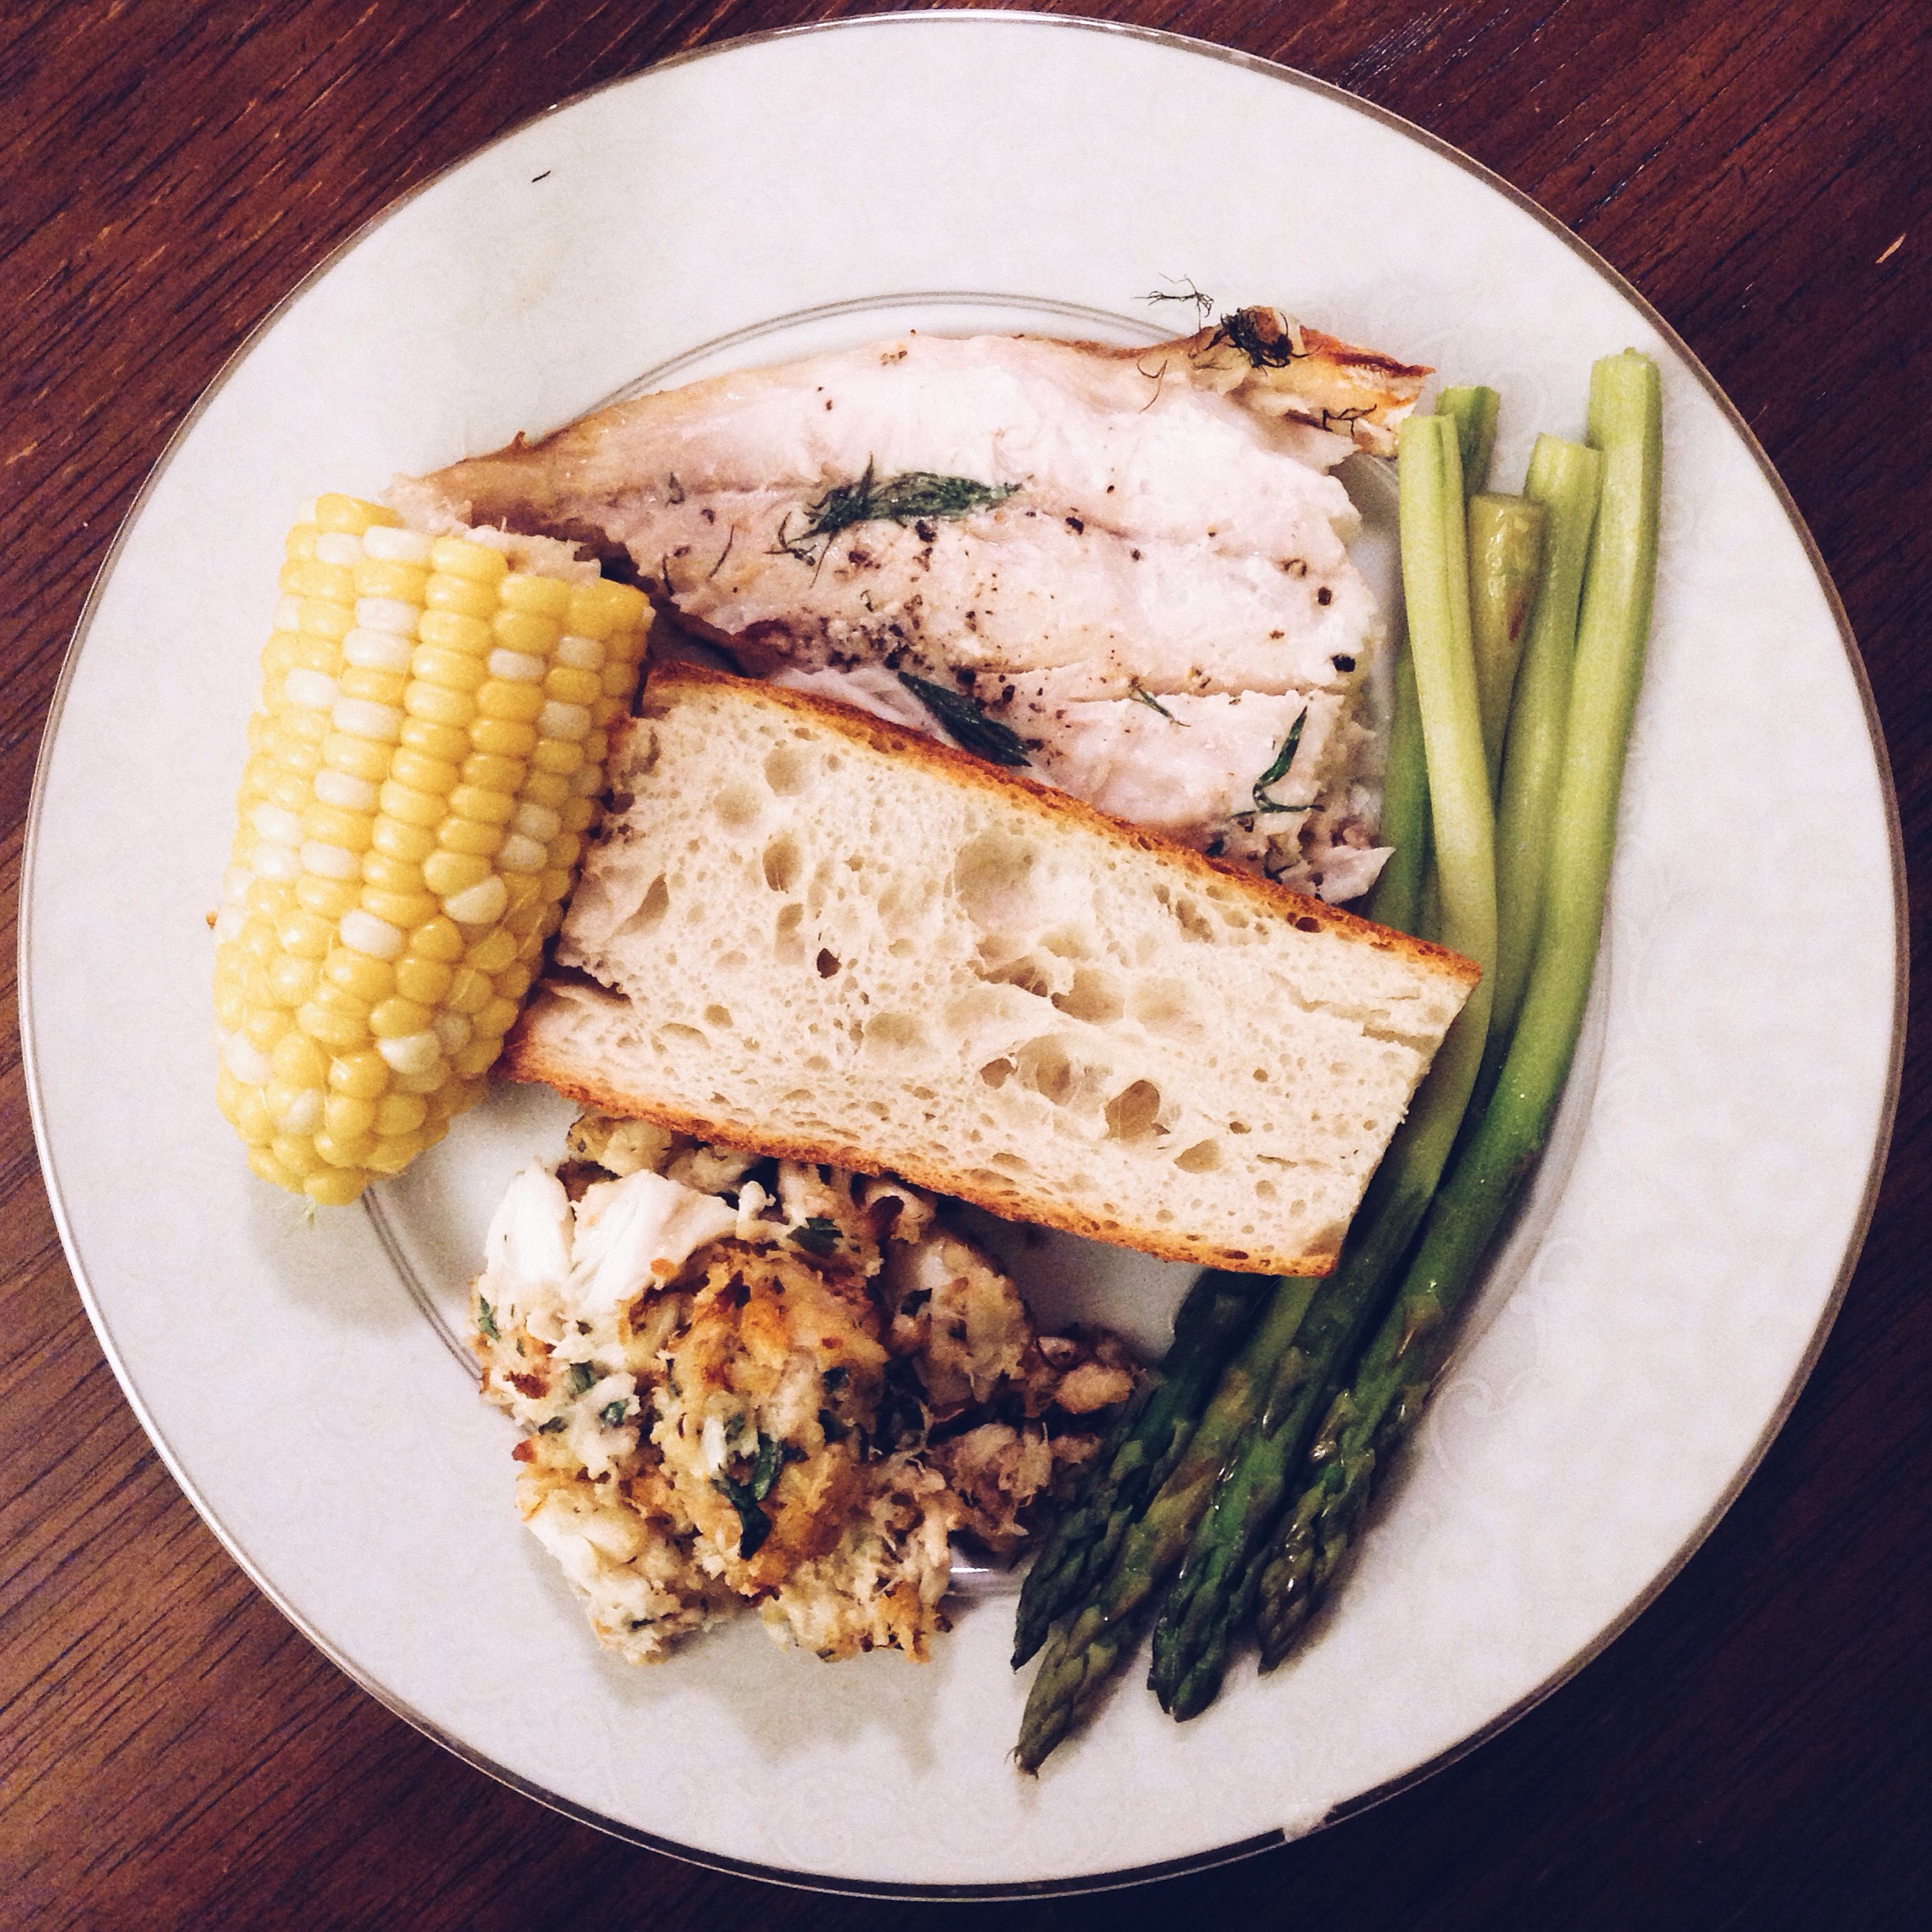
Sales. Duh. Look at what’s on sale, see if anything is calling to you, and try to use those items as the basis for your menu. I saw that mussels were on sale, this week, and bought 2 pounds for a nice Moules Marinieres dish, that I’ll have with bread and a cabbage salad. Also, I got some beautiful branzino for roasting, which was only a whopping $5.99/lb.

Are there any foods/meals I MUST have, no question?

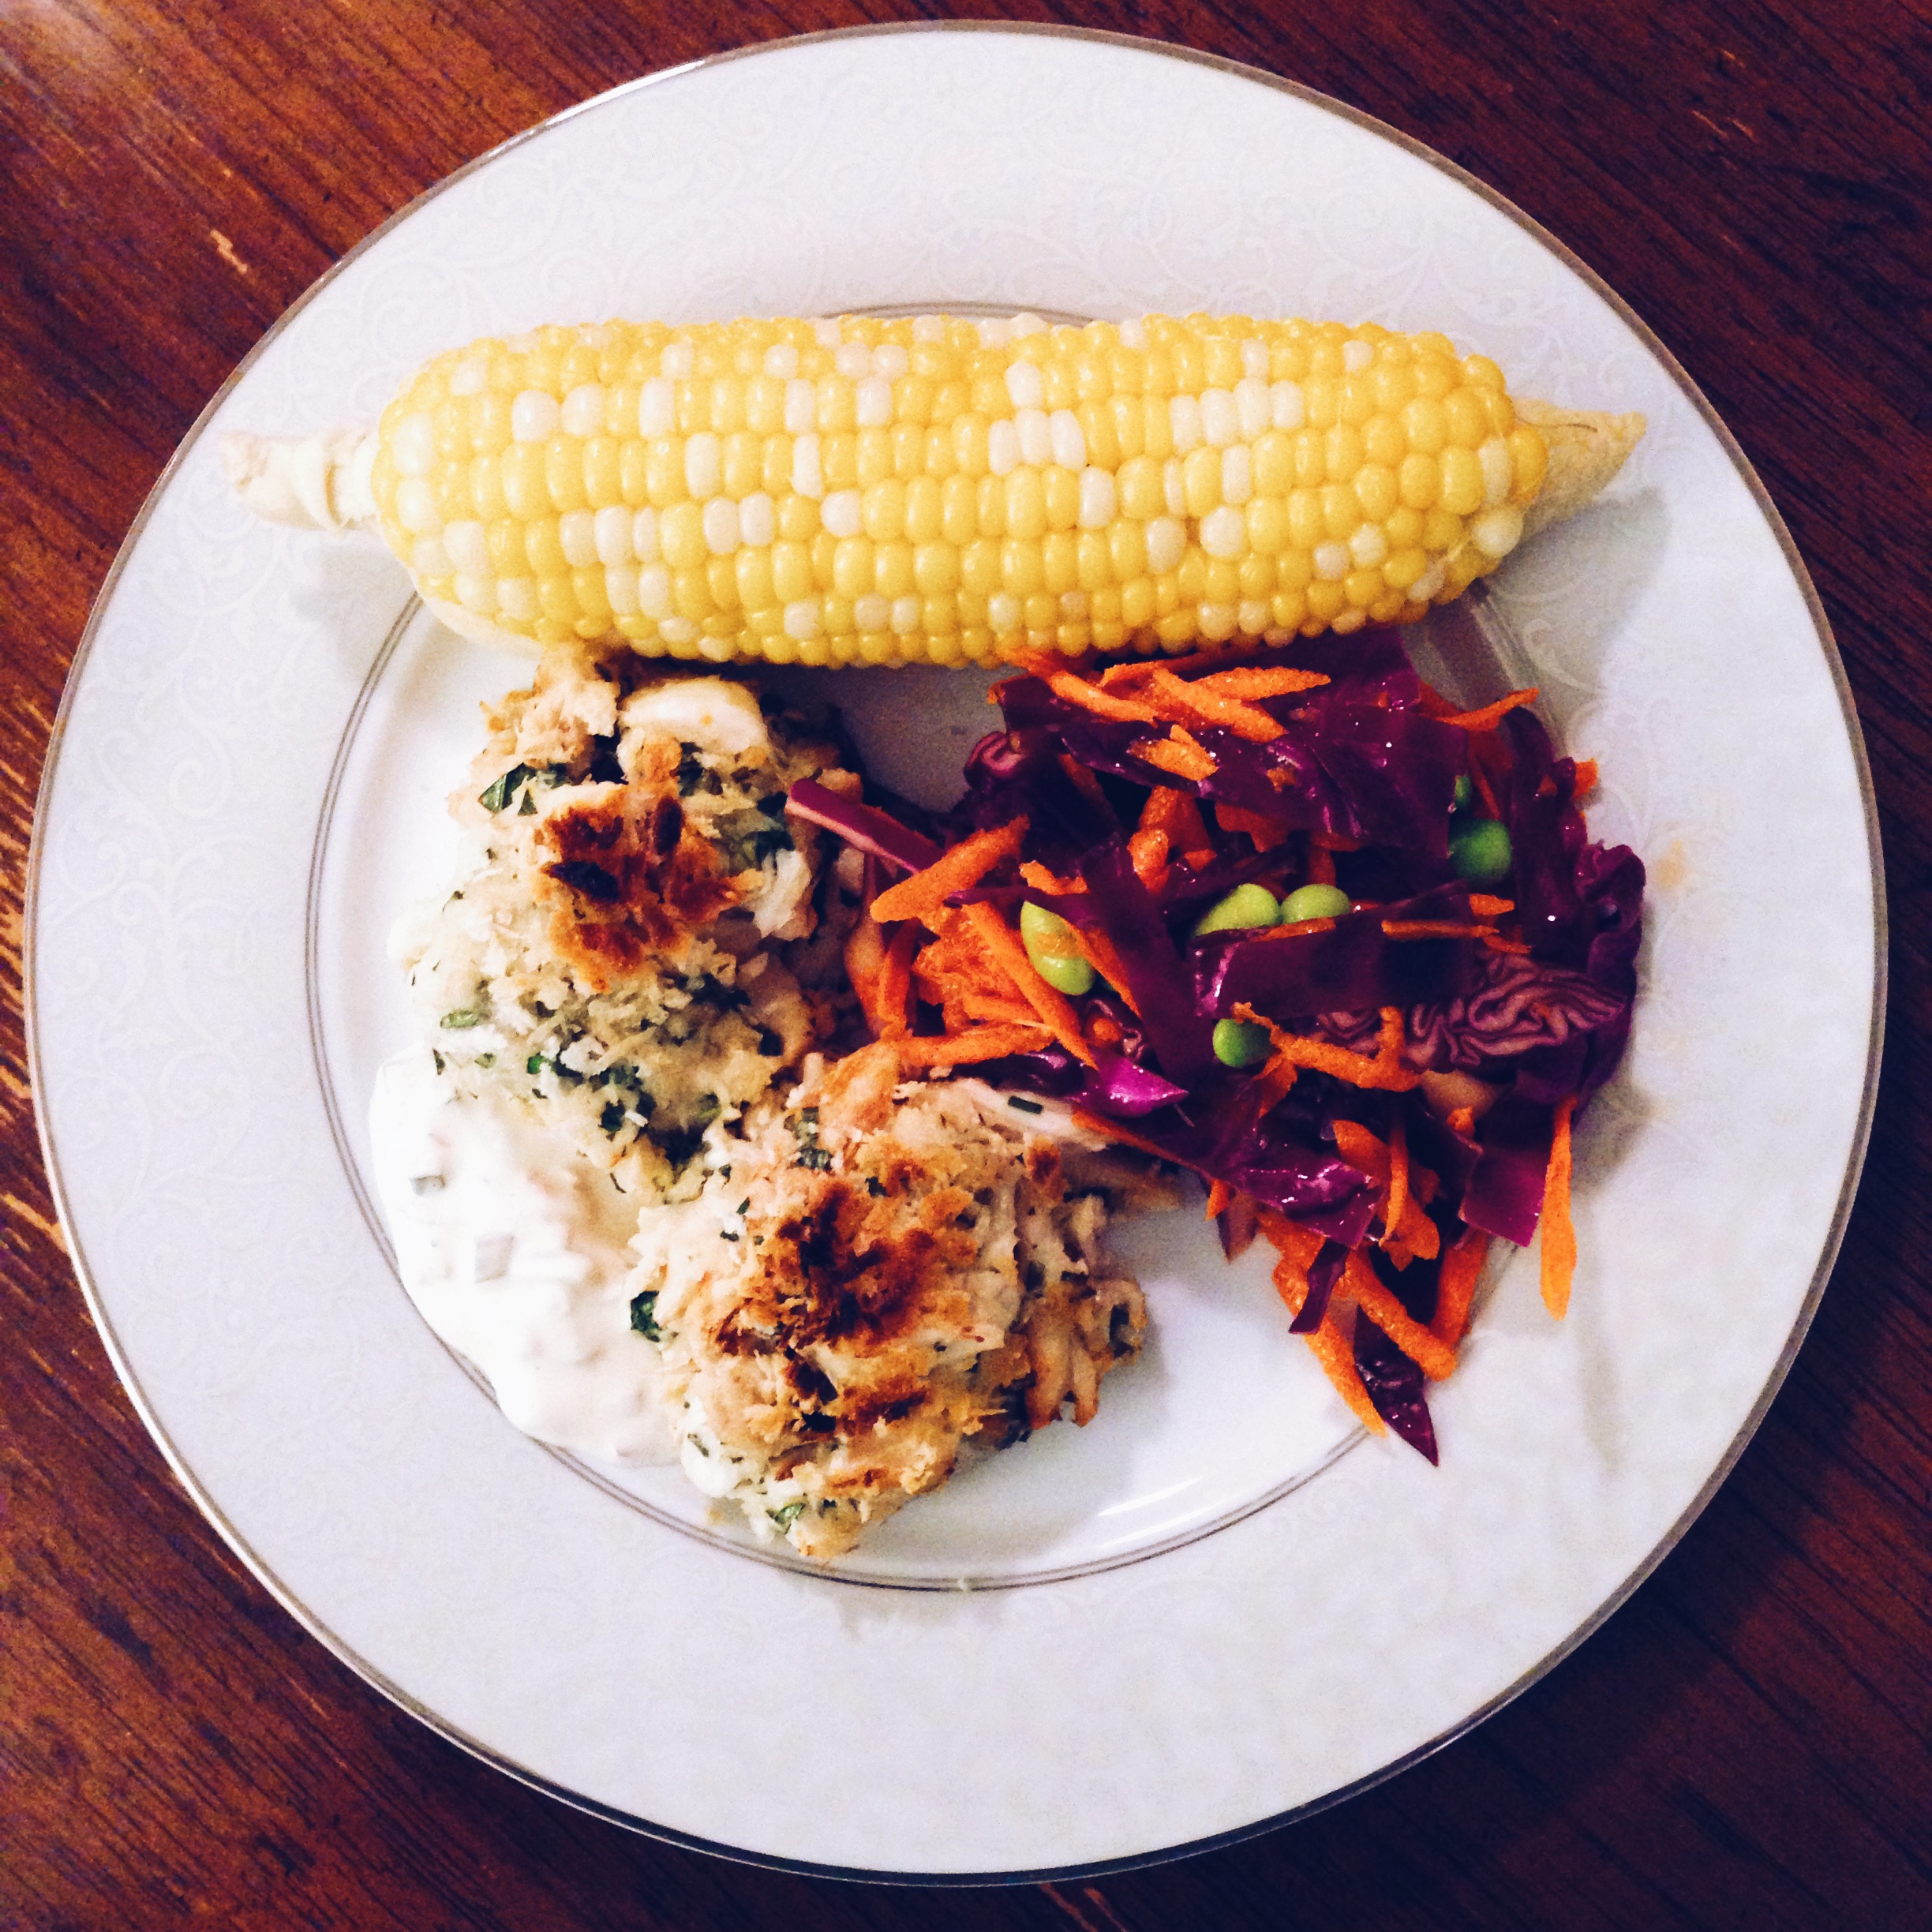
Admittedly, this isn’t always something we can ask ourselves when meal planning. I could say “I’m on a budget, but I must have caviar for breakfast every morning,” but that would be insane. However, if you are very in tune with what your body, heart, and soul crave, it can be helpful in setting more parameters for the rest of your meals. For example, this week’s menu is cheaper on the grocery-front, but I made sure I could still eat seafood, because that is what I’ve been craving. After purchasing crab meat, branzino, and mussels, it became clear that I had to be very mindful about the cost of ingredients for side dishes and the other meals. Though quinoa isn’t the most affordable grain out there, it was on sale, and I could combine some cheap canned goods (artichoke hearts and chickpeas) and some fresh vegetables for a hearty, filling, and relatively inexpensive meal/side dish.

Using these questions as a guide, here’s the menu I’ve come up with for the week (items in italics were on sale)

Monday, August 17

  • L: Salade Nicoise
  • D: Moules Marinieres (mussels cooked with garlic, shallots, white wine, and broth) + red cabbage, carrot and edamame salad + toasted bread

Tuesday, August 18

  • L: Quinoa salad w/ edamame, artichoke hearts, cherry tomatoes, yellow peppers, and chick peas
  • D: Roasted branzino + quinoa salad + asparagus

Wednesday, August 19

  • L: Leftover branzino w/ jasmine rice
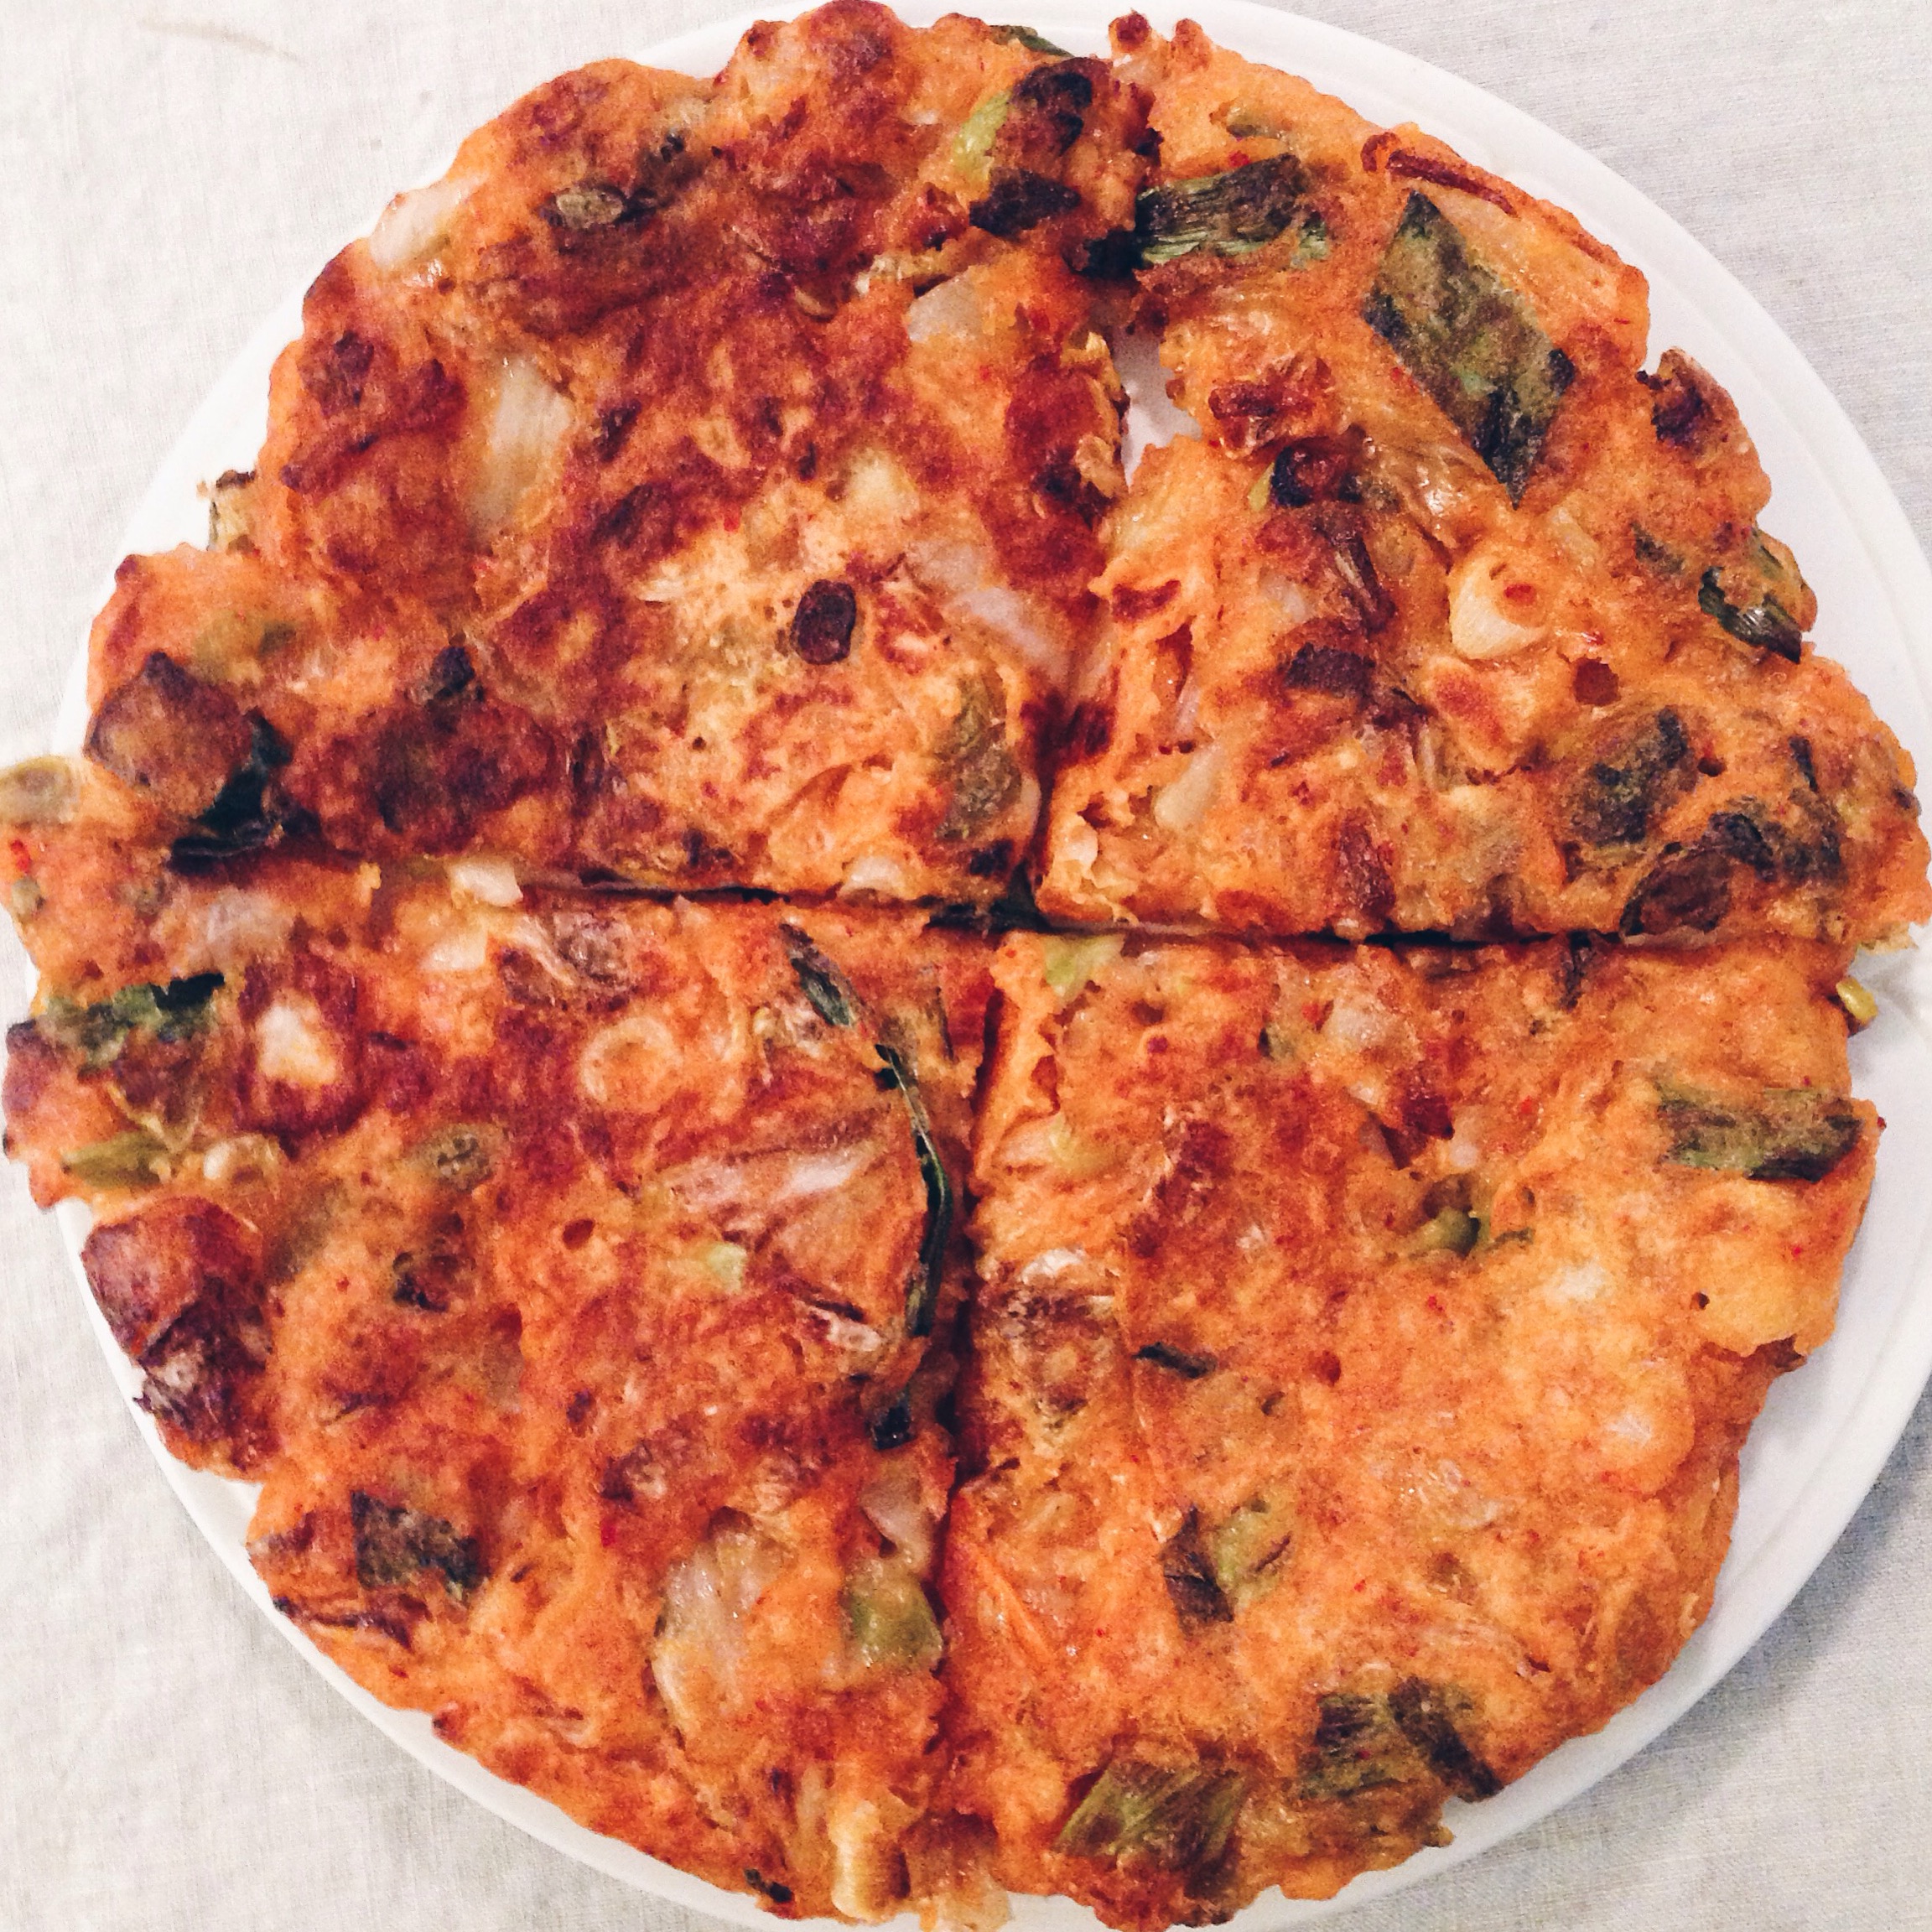
  • D: Kimchi pancake + chicken thigh katsu + jasmine rice + red cabbage, carrot and edamame salad
  • Dessert: Homemade oreo ice cream sandwiches

Thursday, August 20

  • L: Chicken katsu sandwiches
  • D: Crab-fried rice + red cabbage, carrot and edamame salad

Friday, August 21

  • L: Pickled egg salad sandwiches
  • D: Spaghetti all’amatriciana

Saturday, August 22

  • L: Leftover pasta
  • D: Visiting family in NJ

Including breakfasts, which usually include toast, or granola + yogurt (not worthy of listing above), my husband and I spent a total of $24/day for what’s still a relatively happening menu. This also factors in extra groceries for certain meals since we will be hosting guests. I totally acknowledge that what I’ve spent is certainly not nothing, and that it may not be a reasonable budget for many. But, the questions I posed above can help someone navigate a budget of any size.

And now, for my favorite egg salad recipe.
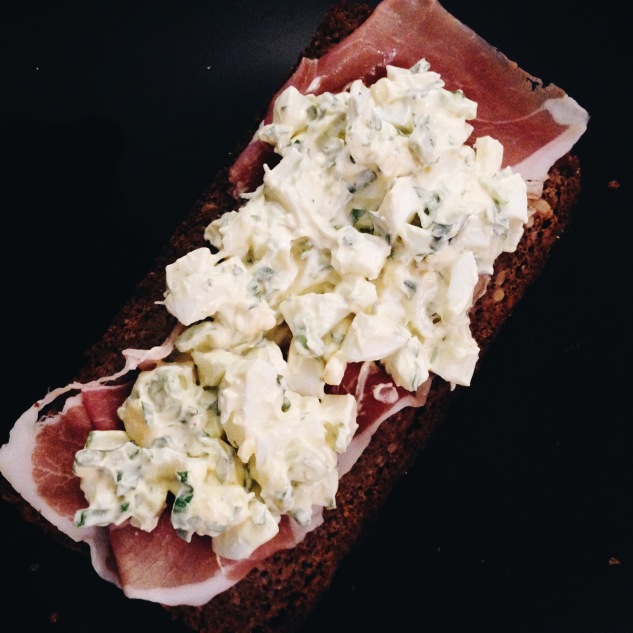
Processed with VSCOcam with a6 preset

Pickled Egg Salad
Recipe taken and modified from Bon Appetit
Servings: 6
Prep Time: 25 minutes
Cooking Time: 10

Ingredients

  • ½ cup apple cider vinegar
  • ½ cup distilled white vinegar
  • 1 teaspoon sugar
  • 1½ teaspoons kosher salt, plus more
  • 8 large eggs
  • 1/3 cup mayonnaise
  • ¼ cup finely chopped fresh chives
  • ¼ of finely chopped fresh parsley
  • Freshly ground black pepper
  • Bread for serving
  • Serrano ham or prosciutto for serving (optional)

Instructions

  1. Bring vinegars, sugar, 1½ tsp. salt, and ½ cup water to a simmer in a medium saucepan. Let cool.
  2. Meanwhile, place eggs in a medium saucepan and add water to cover by 2”. Bring to a boil, cover, and remove from heat. Let sit 10 minutes. Transfer eggs to a bowl of ice water to cool. Drain, peel, and return to bowl. Add pickling liquid; cover and chill at least 12 hours. Remove eggs from pickling liquid. Coarsely chop; mix with mayonnaise, scallions or chives, and parsley in a medium bowl. Season with salt, pepper, and some pickling liquid, if desired. (I used about 2 teaspoons.)
  3. Top bread with pickled egg salad, some chervil (if using), and a slice of ham or prosciutto (if using).
  4. Do Ahead: Eggs can be pickled 1 week ahead. Keep chilled.

Coming up on the Meal Planning 101 Series: On Navigating Time Constraints

Menu Series: Forcing Myself Out of a Funk

In an earlier post, I mentioned that I was feeling unmotivated and uninspired, and that I was going to try to embrace a less coordinated approach to meal-planning and cooking.

I lied.

I’m not sure what happened, but after the weekend, I felt inspired again, and created a somewhat intense menu for the week. To be honest, I feel a bit ashamed that I couldn’t hold onto my public commitment to embracing a more nebulous mode-of-being. It would likely be healthy for me to learn how to not plan every day of my life with a high standard of precision. But maybe I’m not ready to embrace the possibility of a new Yejin.

In any case, I was lucky to spend time with lots of loved ones, over the weekend. A part of me wonders if love and good people give me life and inspiration (call me Needy McGee). Strangely enough, my soul’s reaction to being around my ridiculously talented, brilliant, and kind friends vacillates between (1) being driven by love and inspiration to do/be better (in a positive way), and (2) feeling totally unworthy of their friendship (definitely not a positive experience). I’m going to spend the next few weeks thinking about why that is.

In the meantime, here’s the week’s menu, and some pictures of stuff that I’ve cooked, so far:

Monday, August 3rd 

  • D: Broiled Maryland crabcakes, steamed corn, and a cabbage/carrot/edamame salad
    Processed with VSCOcam with a5 preset

Tuesday, August 4th 

  • L: Pasta salad w/ mozzarella, cheddar, olives, cherry tomatoes, tuna, and basil
    Processed with VSCOcam with f2 presetD: Whole snapper stuffed with lemon, herbs, and shallots, pan-fried and then roasted w/ bread and steamed asparagus
    Processed with VSCOcam with hb1 preset
    Processed with VSCOcam with a5 preset

Wednesday, August 5th

  • L: Pasta salad
  • D: Black bean tostada topped w/ lettuce, avocado, roasted corn salad, and sour cream, and a cabbage/carrot salad
  • Des: Double chocolate butter cookies
    IMG_2084

Thursday, August 6th 

  • L: Leftover black bean tostadas
  • D: Pesto pasta w/ green beans and potatoes, and an arugula salad

Friday, August 7th

  • L: :Leftover pesto pasta
  • D: Kimchi fried rice w/ tofu, and garlic sauteed bok choy

Saturday, August 8th 

  • L: Fried green tomatoes BLT w/ garlic aoili
  • D: Dine out

Sunday, August 9th 

  • B: Sour cream and orange coffee cake with dark chocolate chips
  • D: Homemade steamed buns w/ pickled cucumbers and braised pork belly

Coming Up: On White Chefs and Ethnic Restaurants: the Fetishization, Commodification, and Appropriation of the Other (plus a recipe for Chinese steamed buns)

On Baking and Learning to Embrace Failure, plus a Recipe for Almond-Buttermilk Scones

I used to hate baking. It felt like such a chore, especially since I would, as a novice, accidentally get flour and butter all over the kitchen and my face, like a hyperactive child. With cooking, I feel like I can always make adjustments, add in different/new ingredients – I can be somewhat creative. Many say that cooking is like an art, while baking is a science.

Well, to those who believe in the “model minority” archetype, I was/am a bad Asian-American and did/do not excel in the sciences. (I used to drive my biology teacher insane by asking “how does __________ know to do that? Does it have its own brain?”)

So, the process of baking used to feel akin to the dread I’d experience whilst doing the physics homework that I barely understood (I have nightmares about taking a physics test at least once a month). I didn’t grasp the purpose of baking powder or soda. I didn’t know why I was doing what I was doing, which is a crucial step before becoming a bit more inventive. And, without this knowledge, I felt doomed to fail.

As a high-strung, anxiety-ridden, productivity-oriented individual, there was nothing worse than dry-ass cake, unevenly baked brownies, hard-as-fuck pastry dough.

Lucky for me, my husband is super into sweets. Like, I have to hide Nutella in a secret location in order to get any for myself. Because I tend to absorb and reflect the things people love, I started to enjoy desserts, too. And, importantly, I slowly and painstakingly started to learn that a dry cake wasn’t some kind of signifier of how awful I am as a human being.

As my love for desserts increased, so did my enjoyment of the baking process. I began to understand more of the “science” behind the process, and can now identify why something doesn’t taste quite right. Strangely enough, I think that this has been important to my growth as a person. It’s almost impossible to fix a baked good, the way one can sometimes can with a stew, soup, roasted dish, etc. Baking (and in particular, failed baking) is teaching me how to embrace my unsuccessful endeavors. Once something is out of the oven, that shit is finished. If it’s not good, I have to sit with it. And rather than ask, “Yejin, why are you the worst and the biggest failure who has ever walked the face of this planet?” I can (sometimes) laugh, feel slightly bad that I’ve wasted a little bit of money, but feel glad that I’ve learned something from the process.

When drama comes from external forces, I tend to stay away. When it comes to judging myself, I’m as dramatic as they come. I’ve realized that sometimes I’m hardest on myself when I don’t actually want to hold myself accountable. This way, I don’t have to listen to someone else’s criticism, because my own judgement is already the harshest and meanest. There is some weird sort of selfishness and self-indulgence that comes with my specific brand of self-loathing. And if I can help solve for this oddly masochistic practice of running away from my own agency by baking and eating sweet things, then I guess I have no choice but to continue getting rounder and rounder. So, I’m publicly committing myself to baking and eating a lot more cakes, muffins, pies, and scones. For the sake of humanity, obviously.

And now, here’s one of my favorite scone recipes:

Processed with VSCOcam with hb2 preset

Almond-Buttermilk Scones with Jam
Recipe taken from Alexandra’s Kitchen
Prep Time: 20 minutes
Cooking Time: 20 minutes
Servings: 8

Ingredients
2 ¼ cups of all-purpose flour
¼ cup plus 1 tablespoon of sugar
1 ½ teaspoon of baking powder
¼ teaspoon of baking soda
½ teaspoon of kosher salt
1 cup of sliced almonds
2/3 cup of buttermilk
1 teaspoon of vanilla extract
1 stick of cold unsalted butter, cut into 1 cm cubes

2 tablespoons of milk
Turbinado sugar for sprinkling

Instructions

  1. Preheat the oven to 375°F.
  2. While the oven is heating, mix the flour, sugar, baking powder, baking soda, and salt in a medium bowl. Add the almonds, and stir to combine.
  3. In a small bowl or measuring cup, whisk together the buttermilk and vanilla.
  4. Cut the cold butter into the flour mixture. You have two options for this step: (1) use a food processor and pulse the mixture until you have a crumb-like mixture, or (2) use two knives or a pastry cutter to literally cut the butter into the flour (on a cutting board) until you have tiny pieces of butter.
  5. Place the mixture into a large bowl. Add the buttermilk/vanilla mixture to the dry ingredients and stir to combine. Once the ingredients are just mixed, pour the mixture onto your cutting board and gently knead the dough together until it us just combined. Do not knead too much – this will alter the consistency of the scones.
  6. Pack the mixture into a ball, and place down onto a floured surface. Gently pat the ball down until it is about ¾ of an inch thick. With a knife, cut the circular shaped dough into eight pieces.
  7. Place the pieces onto a parchment-paper lined baking sheet. Brush the scones with milk and sprinkle with sugar.
  8. Place the scones into the oven, and bake for about 18 minutes. You want them to be a little golden brown, so check on your scones after about 15 minutes.
  9. Take your scones out of the oven, and let them cool for about five minutes on a cookie sheet. Cut the scones horizontally and fill with your favorite jam! I’ve personally been rather fond of blueberry jam, as of late.
  10. Enjoy!

Coming Up: Menu Series: Forcing Myself Out of a Funk